One of my goals for 2020 is to pursue my curiosities as hard as I can, and one of those ways is to create fun little products using technology that I have always wanted to try.
To kick things off, I started by building a mobile app that displays daily NBA scores and stats using React Native and TypeScript, available today on the Apple App Store and Google Play.
This post is going to walk through the decision making process around planning app features and scope, how I chose the technology I ended up using, and the build process itself.
Decision Making and Scope
When I was deciding to make an app using React Native and TypeScript, I was thinking of keeping it as simple as possible, with the ultimate goal of shipping an app. I thought I had spent far too much of my personal time starting and abandoning projects, and the only way to get over that was to start and ship something to completion without getting distracted.
With that in mind, I decided that my mobile app had to be simple, self-contained, and something that I myself would personally find useful. Additionally, I wanted it to have extendability, feature-wise, so that it could be an on-going project that continues improving over time.
Fortunately, I found out that the NBA has an amazing API (through NBA.com) that is largely undocumented officially, but there were quite a few resources available that exposed the endpoints. I’m a big fan of basketball, and I enjoy keeping up with basketball games that happen daily, so I thought this would be a good place to start.
After spending some time mapping out the endpoints (actually making requests to each endpoint and seeing what I could get), I found that there was a ton of information available, and the feature set for this app could spiral out of control quickly. I was getting excited by the sheer amount of data that I could link together to display scores, have player profiles, have historical performance, visualizing all of that data…
You get the point.
That’s where I would like to share my first lesson: create a rough idea of what you want for the entire product, then cut it down to the smallest possible complete implementation/feature.
If you can make it the most compelling part of your product idea, even better.
In my case, the scope was quickly trimmed down to displaying the scheduled NBA games in a day, displaying scores and stats for the game as they are happening or are completed, and being able to navigate between days. This made the goal of creating a shippable product much more attainable, and gave me plenty of compelling reasons to continue development if I found that I wanted to add more features later.
Choosing Technology
Building a mobile app can be done using several different approaches nowadays, but I wanted to dig a little deeper into why I chose React Native, TypeScript, and some of the other choices I made.
React Native
React Native has been a curiosity of mine since I found out you could make cross-platform mobile apps with a single codebase. It really did seem magical, so I chose React Native purely because it was the only choice I had in mind.
Alternatively, I could have gone with Flutter, which is another cross-platform app development offering from another tech giant, but I decided that trying to learn Dart, which is the language that Flutter uses, could be saved for another project.
React Native also has a massive community, which includes tons of great resources for learning how to get up and running with it, along with lots of open source libraries that immediately provide functionality to your projects.
TypeScript
Coming from the lovely world of Go development, I (mostly) enjoy its statically typed nature, so I wanted to explore TypeScript and implement it as part of my project.
There was a bit of a learning curve, for both figuring out how to properly use types as part of the JavaScript/React Native code that I was writing, but also configuration to let it be as strict/loose as I wanted it to be with rules.
Admittedly, it’s a lot less strict than it should be, as part of my app, but I’m learning as I go, so I figure I can tighten it up down the line if I want to keep going with it.
Expo
Expo is one of the fastest ways to get up and running with React Native, and even with TypeScript! All it took to have something up and running was going through the create a new app section of their documentation, and getting to the point where I was comfortable enough to start making my own edits.
If I were to do this again, however, I don’t think I would choose to do this with Expo. Expo brings a lot of convenience to the app development process, but I also felt handcuffed by whatever library versions it could support. Also felt like the expo build process is extremely convenient, but now I am locked to continuing to use Expo for building my apps, which doesn’t feel ideal.
Great for starting out, not great beyond that, in my personal opinion.
React Redux
React Redux is one of the most popular ways of managing state in the world of React. At a certain point of developing the app, I was juggling and processing too much information in each component, that it felt like I needed a way to have predictable place to read data from and update when certain actions were taken.
Honestly, this was probably overkill and I was doing some funky things during development, but it did provide some much needed optimizations around rendering, and also laid out the groundwork for future improvements I’d like to do to the app.
An alternative would have been MobX, but I didn’t dig too deep into either one and just decided to go with the one I had a tiny bit more familiarity with.
Build Process
There were three distinct phases of building this app:
- Proof-of-Concept
- Minimum Viable Functionality
- Design Polish
Proof-of-Concept
After taking the time to map out the NBA API, I whipped up a quick proof-of-concept to get a sense of how my app might look once more data was correctly hooked up. It didn’t take too long to get to this point:

I was able to get the list of games that were scheduled for the current day, and if it was happening, display the current score. At this point, I was still in the middle of creating a really tight scope of what the project could be, so I was fetching all sorts of information: player profiles, game play-by-plays, advanced statistics that mean absolutely nothing to me.
All of it sounded like it would require a ton more work to implement into a fully functioning app, so I made the decision to really cut scope and create the minimum viable level of functionality.
Minimum Viable Functionality
This point of development was where I spent the bulk of my time: I created a bunch of different components that would display schedule games, a different screen that would display further details about the game including stats by player, and a way to navigate to (and fetch data for) different days in the calendar year.
I would initially build a component as quickly as possible, not worrying about re-usability or composability, instead just charging ahead to getting something “that works” instead of something that was “perfect”. This approach let me get to the point of “minimum viable functionality” much quicker than otherwise, and then I spent another chunk of time making small changes that would make the app better for the next time I wanted to add more features.
Not new to me, but it is an important lesson: if you’re going to build something, leave it in a better place than you found it.
I would keep come back to my code, and add something new, but then clean up something in or around the area I had just built. This was a sustainable way of continuously improving my codebase while adding new features. If I had time, I would add tests to really drive home the idea of leaving it better than you found it!
Design Polish
After building the minimum viable functionality, I spent a bit of time thinking through some usability questions:
- How would users identify teams quickly, and differentiate them from other teams while looking through a list of games?
- Does displaying major stats by aggregate, and displaying the breakdown of that aggregate by player, convey the desired information in the right way?
- How would users navigate between different teams’ players when viewing game details?
I’d like to add here that this was another lesson that was driven home by this part of the process: thinking about design and user experience should start as early as possible, so that you haven’t created a bunch of functionality that may be painful to change if you realize something about your user experience.
I thought of some answers to my above questions after lamenting how late in the process this was, but I thought I made some good process:
Fortunately, I have some really good designer friends (thanks Wayne and Charlene!) who provided a ton of helpful feedback and suggested some improvements:
- Create a little more space in each row by shrinking the font size used inside each row, but preserve the height and padding of the row
- Create better differentiation between each row by having a subtle background colour change on every other row
- Colours were a little too thin to be useful; use it in a more apparent way, maybe thicker bands at the opposite ends of the rows
- Re-consider the pop-open drawer on game details; it may be useful, but the increase in scrolling doesn’t feel like a great user experience
Mind you: this is a summary of the changes I made to the app after their feedback.
This does not capture the amount of conversation we had so that they could explain or show me what they meant with mockups, and the number of iterations we went through that they gave feedback on. The process was incredibly helpful and really helped improve the usability of my very simple app.
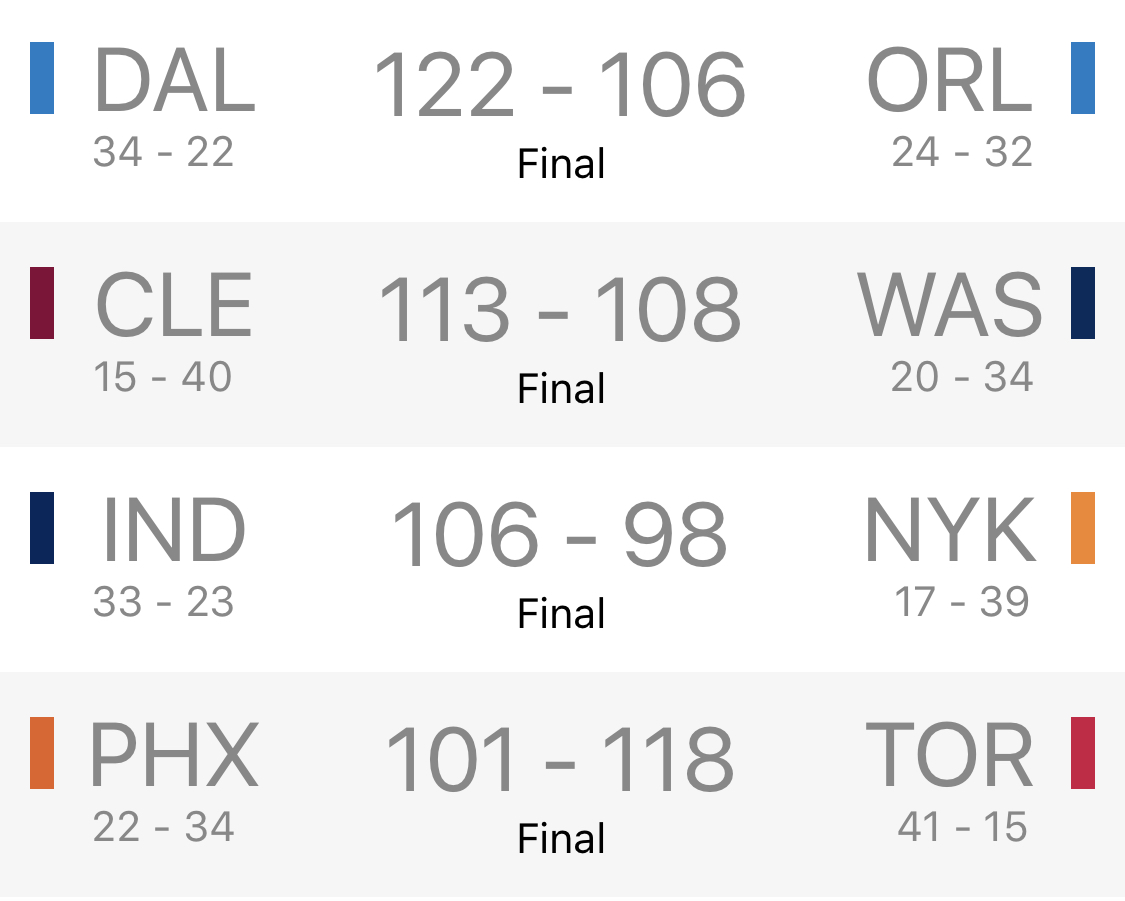
Those changes all made a huge difference:
Much of the design polish happened at this time, and it came so far from where it started.
Shipping
After signing up for my Apple Developer and Google Play Developer accounts, I started the process of creating the builds for each platform. This was quick and easy, aside from a few minor speedbumps along the way. I uploaded my builds, filled out all of the metadata, and submitted everything for review. I was fortunate that the review process was so quick for my app, which I think is because it was so simple, but I’ll take what I can get.
I set out to build and ship a mobile app that shows NBA scores and stats, and I managed to complete my mission in a little under 5 weeks.
There’s plenty of room for improvement with the app’s features and functionality, but I shipped an app, and I am so proud and happy. I built something with React Native and TypeScript, managed my project to the right sized scope for the timeline I gave myself, and collaborated with friends to make it look like a fairly well polished app.
If you give the app a try and have some feedback, or want to follow along with my future projects, feel free to reach out on Twitter (@jonlim) or LinkedIn.
Thanks for reading!